F-stop Printing
- Home
- F-stop Printing
What "F-stop printing" is and why it's so useful.
Everyone who’s ever made a black and white print in the darkroom knows that the longer the period of time you expose the paper, the darker will be the resulting print. For many people, that’s about where the theory ends, and they use test strips to see how much exposure they need to give a particular print. When they want to darken an area of the image by “burning in”, they use another test strip to see how much extra time is needed.
Wouldn’t it be nice if there was an easy way of deciding how much extra exposure results in a given amount of darkening? Well, there is, and it’s called “f-stop printing”. Not to be confused with the “f-stop” of a lens aperture, f-stop printing was first popularised by the American photographer and printer Gene Nocon in his 1987 book “Photographic Printing”. He introduced the notion of a “unit of exposure”. Each unit of exposure darkens the print by the same amount, so it follows that if you know how much darker you want a particular area you can estimate quite easily how many extra units of exposure you need to give it.
What is a "stop"?
Because photographic materials don’t respond to light in a simple linear manner, the unit of exposure is not constant – in fact the size of a unit depends on how many units the material has already received. You can see this if you examine the shutter speed control on your camera. You’ll see that each speed is a doubling or halving of the one next to it, not a linear sequence – hence the sequence of for example 1/15, 1/30, 1/60 second – and each speed step is called a “stop”. Each stop darkens or lightens the image on the film by the same amount. Well, it’s exactly the same with printing paper!
Gain control of the process!
If you want to darken or lighten a print it makes sense to do so in “stops” just as you would when using a camera, and it’s exactly this principle which is built in to all our enlarger timers and meters. But because printing materials have a much higher contrast than film, changing time in full stops is much too coarse an adjustment. For example, a typical grade 3 paper has a range from white to black of about three stops, so our timers subdivide each stop into fractions – down to as fine as 1/24th of a stop on the StopClock. This gives you fine and predictable control of print density, and allows you to think in terms of the tones on the print instead of the number of seconds exposure. Thinking about exposure in terms of seconds is just confusing, think in print tones and let your f-stop enlarger timer do the work!
Why not simply use "seconds"?
Consider the two test strips shown below. The one on the left has been exposed in steps of 5 seconds i.e. 5, 10, 15, 20, 25 seconds, and the right hand one in half-stop steps. You can see straight away that the increase in density between the first two exposures in the left hand print is much greater than between the last two. But in the right hand one, the increase in each consecutive step is constant.
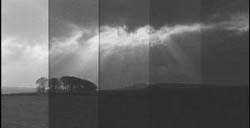
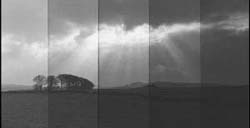
Our timers can generate the time sequences to make such test strips automatically, and in steps as coarse as half a stop for initial experiment or as fine as 1/12th stop for fine tuning of exposure. And whatever step size you’re using, each step on the test strip corresponds to one press of the Time up/down keys so, for example, if you judge that the middle strip represents the optimum exposure, just press Time Up twice (two steps to the right from the starting point) and you’re ready to make the exposure!
What about burning in?
It’s easy to judge burning-in times too. For example if you decide that the sky looks best in the strip two steps darker than the main exposure, simply burn in the sky for two extra steps of time. There’s no need to work out the time, the timer does it for you. All you need to do is concentrate on the look of the final print and make the artistic decisions. The technical side will be taken care of by your StopClock or Analyser.
The StopClock can store sequences of exposures too, so you can set up a series of burn-in exposures while studying the proof print with the lights on. Then, when it’s time to make the print all you have to do is press the foot switch or Print button and shade the relevant parts of the print. No need to keep times in your head, or to re-set the timer between exposures.
More advantages!
If you use variable contrast paper and a colour enlarger you’ll be aware that when you change grade you usually have to change exposure too. But did you realise that the change in exposure with grade is constant if you work in stops? If you change from grade 2 to grade 3 for example you might need to increase the exposure, and you’ve probably needed to make a new test strip at the new grade. If you find that the grade change for one print requires an extra quarter stop of exposure, this will be true for any print and any initial exposure. So when you next change grade from 2 to 3 you can increase the exposure on the timer by a quarter stop and save the need for another test – it doesn’t matter what the grade 2 exposure time was, increasing it by a quarter stop will always have the same result.
If you change the size of a print you need to change the exposure time. It can be very tedious to work out all the times when the print has several burn-in exposures. With the printing sequence stored in a StopClock Professional, you only need to alter the base exposure – the timer works out all the new burn-in times for you. What’s more, if you know that a change from 10×8 to 16×12 requires an extra 1.4 stops of exposure, you can quickly dial that into the timer and save yet another test strip!
What could be simpler?
There’s no need to remember the times for the burn-in exposures, or to adjust the timer between exposures. Having made a small proof print, increase the base exposure for the big exhibition print and the StopClock does all the calculations for you, automatically retaining all the density relationships for the burn-in exposures! Similarly, if you want to make the same print on a different type of paper, which has a different sensitivity, all you need do is determine the required basic exposure. If you burn in the same number of f-stops, the results will be just the same on the new paper (and the StopClock will have already worked out the times for you!)
The superb StopClock Professional (and the 500 and Vario versions) really comes into its own when you have to produce a number of copies (perhaps at different sizes) of a complex print with several burn-in exposures. Once the StopClock is programmed with the exposure sequence, all you have to do is press the foot switch and shade the relevant areas of the print while the timer calculates and times each exposure precisely. No longer do you have to fiddle with scraps of paper or keep complex time sequences in your head. The margin for error is reduced and with it the amount of paper in your waste bin.
The biggest advantage of f-stop printing comes with experience however, and that is the ability to judge how much to alter exposures or to burn in areas without the need to make endless test strips, because you start to think in terms of density on the print. And it’s easy to interpolate intermediate exposures between two test strips because the density changes are linear. And because the StopClock is so easy and intuitive to use, you can produce the print based on your estimates that much faster.
The Analyser and ZoneMaster (and indeed the Heiland SplitGrade system) all use the same f-stop system of exposure control, offering similar advantages to the StopClock.
Some more technicalities.
To understand a little more about how the system works in practice, have a look at the diagram below. This shows a grey scale which progresses from white to black in twelve equal-density steps.

A grade 3 paper has a printing range of approximately three f-stops, so in a twelve-step grey scale each step represents a 1/4-stop increase in exposure. Suppose an exposure of 4.0 seconds is sufficient to just put tone on the paper. The diagram shows the exposures then necessary for each shade of grey. Now suppose the magnification is increased so that the exposure required to just put tone on the paper increases to 7.5 seconds. The diagram below shows the new exposure times for the grey scale.

You will see straight away that the times expressed in seconds are quite different than before, but expressed in f-stops they are identical. So…..
Our timers have two simple press-button controls to set the time – up, and down. Each press of a button alters the time by a fraction of a stop allowing you to move the exposure up and down the grey scale in an easy predictable way. The size of each step is adjustable, and you might want to use a smaller step when working on a harder paper grade for example. This diagram shows the relation between exposure and time steps.

The number of steps between white and black depends on the size of the steps and the grade of the paper. The harder the paper, the more effect a given step size will have; when working with an f-stop timer you would generally use bigger steps on softer papers and smaller steps on harder papers. A typical grade 0 paper has a range of about 5 stops so using 1/3 stop steps gives you about 15 steps from white to black. Grade 5 on the other hand may only have a range of about 1.5 stops, so using 1/12 stop steps gives you about 18 steps – much the same number. So if you change the step size to suit the paper you’re using it will be easier still to judge the effects of time changes.