Flashing and Fogging
- Home
- Flashing and Fogging
What is it and why is it used?
Flashing and fogging are very useful tools in the printer’s armoury. They are essentially the same thing – the exposure of paper (or film) to a small amount of white light. The difference is that fogging will actually put tone on the paper, whereas flashing does not sufficiently expose the paper to produce a tone.
What flashing does do, however, is sensitise the paper to small additional exposures. This is because photographic materials exhibit a sort of “inertia” – they need a small amount of exposure before any tone is produced at all. So, if this exposure is provided by a small flash of white light, any additional image-forming exposure will produce tone more quickly. The practical upshot of this is that if you pre-flash paper, the highlight detail will generally be improved and there will be a small decrease in overall contrast. On variable contrast paper for example it is possible to make a delicate high-key print by flashing the paper and then making the image exposure at a hard grade, e.g. 4 or 5. Without the flash, printing at such a hard grade would give little or no highlight detail. Increasing the flashing exposure so that tone is just placed on the paper can also produce a pleasing result in the highlight areas, depending on the image.
Many printers are reluctant to use the technique however, because of the difficulty of arranging for the small, evenly spread amount of white light necessary. Some might use a separate enlarger, others remove the negative from the main enlarger before or after making the image exposure, yet others might use a diffusing disc under the lens. None of these techniques is particularly convenient, and this is why we developed the PaperFlasher. This handy little unit is ideal for the task. Its own little light source can be mounted on the enlarger lens board so that it shines on the baseboard, and the even spread of white light can be controlled precisely with its built-in timer. You can even dodge and burn with the white light so that only certain areas of the image are affected – by projecting the image through a red filter onto the paper, you can see where those areas are precisely, too.
What results can i expect?
Here is an example of the PaperFlasher at work; the delicacy of the highlights might not be easy to spot from these scans but they should give you an idea of the possibilities of the technique.
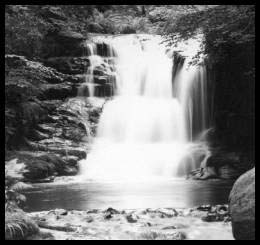
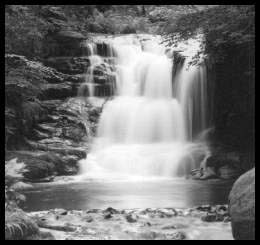
It should be clear from this that the second image has more highlight detail compared to the washed out white water in the first. You may be thinking that you could achieve the same result simply by burning in the white water area. Well, try the two techniques and see the difference – burning in will tend to darken the shadow areas excessively and muddy the highlights, and in any case requires much more work in masking the areas to be burned in and so on. A combination of flashing and then gently burning in at a hard grade can dramatically increase the detail while retaining the highlight delicacy in waterfalls like this, and similar subjects, without the muddiness that often results from burning in at a softer grade alone.
More information about flashing is available on Les McLean’s web site here.